The following has been sent to my by Brian Albiston (Wishful Thinking Energy here). He says he will start the test later today and live data will be posted here when the test begins.
This test is of a new type of reactor design and will use water vaporization calorimetry to determine COP. The new design attempts to combat several of the failings of my previous reactor designs. My last two reactors have used Kanthal A1 heating coils wrapped around the exterior of an alumina tube similar to the MFMP Glowstick designs. The major problems I’ve had with this design are:
- It requires a significant amount of power to heat the very small amount of fuel to the desired temperatures. It requires 1200W+ to heat a gram of fuel to 1100C. This becomes problematic for water vaporization calorimetry because the boiling becomes very vigorous and steam quality starts to degrade above 1200W (in my calorimeter).
- The Kanthal wire must be heated to 1300C+ to reach a reactor interior temperature of 1100C. The Kanthal A1 degrades quickly at this temperature and I have suffered many burnouts similar to other experimenters. On my last reactor I burned out 3 coils before I gave up.
- Exterior coils are a very inefficient way of delivering heat to the fuel as most of the heat is lost to the environment.
The current reactor is an “inside-out” design that places the heating element inside the reactor in contact with the fuel. Since it is a new design that has never been tested before chances of failure are high…probably very high. It is completely unknown how the heating element will behave in the fuel environment. I’m using a $20 silicon nitride furnace ignitor. The ceramic base of the ignitor is potted in alumina cement in the center of the reactor alumina tube. The bottom end of the reactor is sealed using a stainless Swagelok fitting with brass ferrules. The other end has a brass Swagelok fitting with pipe thread adapters. Ceramic fiber insulation is used to attempt to contain the heat to the alumina portion of the reactor.

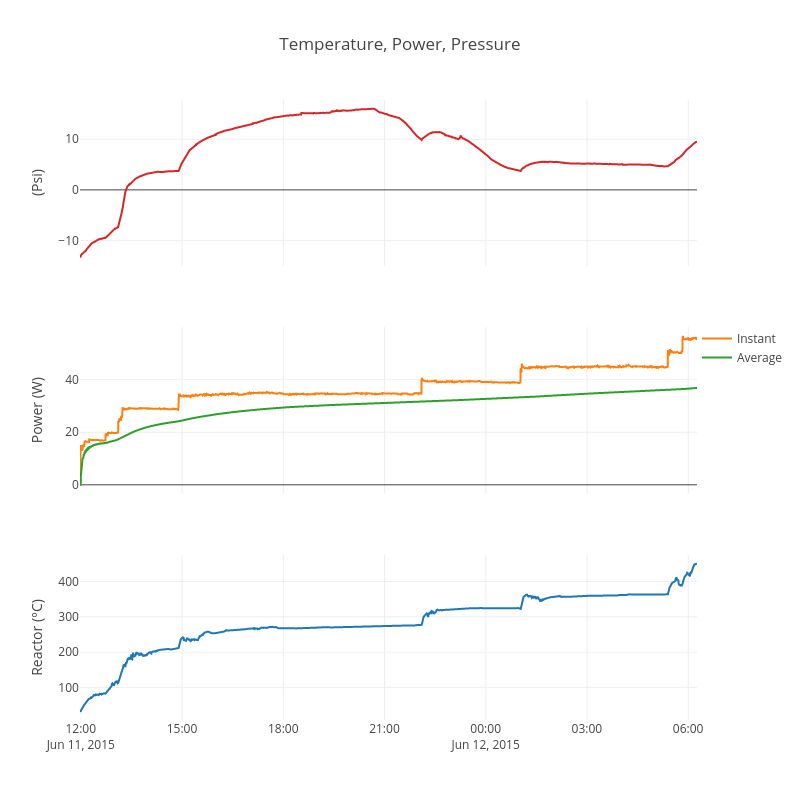
The ignitor wires pass through the Swagelok fittting and pipe and are then potted in epoxy. The wires will definitely be a weak point of the design as they are very close to the hot area. Making a gas tight seal around the wires also proved very difficult. Even though they were potted in epoxy I found that air would escape the reactor by leaking between the insulation and the wire itself. I had to connect the stranded wire leads to solid copper wire and pot both in a wire cap to prevent the leak. The reactor was pressure tested and required several days to leak down from 44 psi to atmospheric. A 0-500 psi pressure transducer is included at the top of the reactor.

A valve is included for pulling a vacuum prior to the start of the test. My reactor will be placed vertically in the calorimeter and oxygen/nitrogen etc. will fall to the bottom which is where the fuel is also located. Thus the fuel would be bathed in air with very little hydrogen if a vacuum is not pulled (at least until the oxygen and nitrogen are gettered by the other reactants).

The fuel is 3.125 g of INCO 255 Nickel and 0.303 g of LiAlH4. The fuel amount is larger than I have used in the past so I have purposefully included a large amount of open space in the plumbing. The fuel amount was mostly determined by what was required to surround the heating element with fuel.
If the test proves successful at obtaining the desired temperatures and reactor longevity I will provide all of the reactor parameters including sizes, manufacturers, retailers etc. If this thing fails at 200 C then frankly I don’t want any other experimenter wasting their time on it. This test is also a test of the calorimeter and my streaming platform as much as it is a test of this new reactor design.
The calorimeter is made from a 5-liter capacity stainless vacuum insulated beverage dispenser. The reactor is placed inside a 2″ pipe and the pipe is submersed in distilled water inside the vacuum flask. The whole calorimeter is weighed on a postage scale so that water vaporization can be measured in real-time. Water is boiled away in 500 g cycles and replenished from an adjacent reservoir automatically.

Electrical input energy is measured using a WattsUp? Pro energy logger. The COP is calculated using the specific heat and heat of vaporization of distilled water:
Qelectric (kJ) = Watt Hours * 3600/1000
Qideal (kJ) = 2256.7 * water (kg) + water (kg) * 4.19 * (100 – temperature_reservoir (deg C) )
COP = Qideal /Qelectric
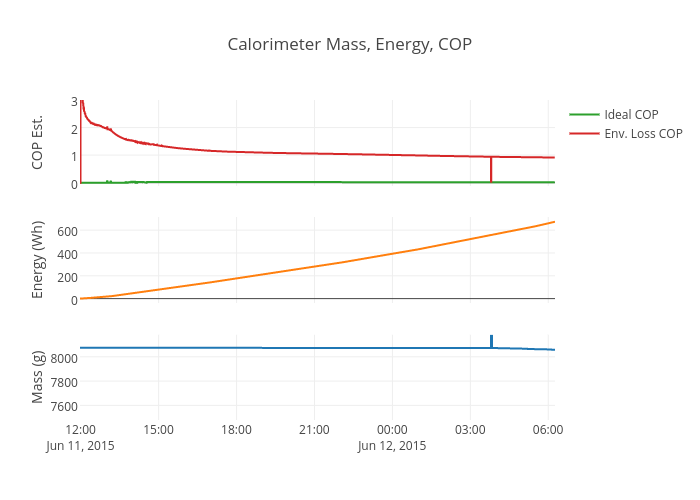
This COP includes all of the system losses including electrical losses in the variac, solid state relay, wiring, and heat losses from the calorimeter to the environment. The COP should always be less than 1 (without excess heat) and will be lower at low power input because the heat lost to the environment is relatively constant (the water in the calorimeter is always at 100 C regardless of input power).
I’ve also included an Environmental loss adjusted COP that assumes a constant 33 W heat loss from the calorimeter to the environment (determined from the calibration). This gives a better picture of the energy actually delivered to boil the water which is more useful since that is what is being measured with the mass loss.
Qideal_env_adusted (kJ) = Qideal (kJ) + Qenvironmental_loss (kJ)
The environmental loss adjusted COP is only accurate when the calorimeter is boiling. It will read a COP greater than one until the calorimeter heats up. Both COPs will be most accurate at the end of each 500 g water mass loss cycle since the first part of each cycle is spent heating the water from the reservoir temperature to boiling.
The calorimeter was calibrated using a mock reactor jig with Kanthal A1 wire.


I plan to heat the reactor very slowly. The first 12 to 18 hours will likely be spent out-gassing the LiAlH4. After that I will raise input power very slowly every couple of hours as I check on it. I suspect that the INCO 255 nickel particle size is smaller than ideal and it may need time to sinter to a larger particle size that will hopefully be nuclear active.
The plotly data stream will be updated every 30 seconds. The full 5 second data set will also be available real-time at the Dropbox links here: https://www.dropbox.com/sh/20w0k1lhdxar3no/AACJXQNkn8XKoiUJQcn97oO6a?dl=0. I will be available sporadically to answer questions.
The test is now live. Here are plotly charts.
Brian Albiston